26 April 2011

Chocolate & Peanut Granola


I have always loved the phrase "like father, like daughter''.  Being compared to the man that raised me, loved me, taught me, got me started in the kitchen, got me out of the first few days of third grade to go and stay in a beach house in Malibu, and is the son of my Meme (another person I am elated to be compared to) is something I am so proud of.  He is makes me laugh, holds me when I cry, and laughs at my jokes even when they don't make sense.  I like to think that I have at least some of those qualities that I can share with my family and friends. 

There is something else that we share, something that I only found out about two and a half years ago.  We both love granola.  We have this strange affinity for it.  I am not sure why it is there, but how can any one turn down granola?  It is crunchy and chewy at the same time.  Sometimes heady with cinnamon and sometimes crunchy with toasted grains, nuts, and seeds.  It can be pebbly or broken into shards or slabs; served with ice cream, yogurt, floating in a pool of milk, or eaten straight from the jar in handfuls (as both my father and I prefer). 

Best of all, it is easy to make and makes the house smell fabulous.  The ingredients are, for the most part, shelf stable so with the ingredients scattered around the cupboards, what are you waiting for?  Heat up that oven!


The specific recipe that I am referring to here is my riff on Nigella Lawson's recipe for Andy's Fairfield Granola.  I cut the recipe in half, for starters, and omitted the ginger and cut back on the sweetness by leaving out the brown rice syrup. 

The end result was more like a bittersweet granola speckled with perfectly toasted peanuts and heady with cinnamon.  It is more of a pebbly granola, but that just makes for better hand-scooping, which, between you, me, and my father, is a wonderful thing.


2 1/4c. oats (old fashioned, please)
1/2c. sunflower seeds
1/3c. white sesame seeds
1/3c. (unsweetened) apple sauce
1t. cinnamon
1/4 c. honey
2T. dark brown sugar
2T. cocoa powder
1c. peanuts
1/2t. salt
1T. oil

-Chuck all ingredients into a very large mixing bowl, mix well, and spread out on a lined sheet pan.
-Bake in a 325f oven for 40 minutes, turning every 10 minutes.
-Let cool thoroughly before storing.


This makes about 4.5 cups.

20 April 2011

Nutty CousCous with Asparagus

Forget everything you know about grain salads- this is a complete revelation.
Do you see those nuts down there?  They aren't ordinary nuts; they are roasted nuts.  Still not convinced?  I don't blame you, but it get's better.  What if I told you that after getting them nice and toasty in the oven, their next order of business is to be ground into a very aesthetically pleasing rubble only then to be tossed with olive oil, parmesan cheese, and Israeli couscous?

I'll give you a moment.


Oh!  And look who decided to join the party....

I told you it was an epic salad.

Do know that I am not due all of the credit, as this was adapted from Laura Calder's recipe for Nutty Pasta.  I used couscous instead of pasta, varied the ratio of nuts, added asparagus, and omitted the orange zest. 


3T. raw almonds
2T. pistachios
1T. pine nuts
....
2 c. water
1.5c. Israeli couscous
....
1 bunch of asparagus, tough ends removed and cut into 1 inch long sticks
....
1T. extra virgin olive oil
1 squirt of lemon juice (I unapologetically used a plastic lemon)
1/4c. grated parmesan


-Begin by roasting the almonds and pistachios for 7 minutes in a 325 oven.  Add the pine nuts to this and continue to roast for another 8 minutes.  When you take the nuts out of the oven, they should have the fabulous aroma of toasted nuts,  but if you have to guess, then I would toss them back in the oven for another 2 or 3 minutes, as oven temperatures can vary.
-Let cool and chop (by hand or with the aid of a food processor) until rubbly.  You are not looking for a powder here, but something along the lines of a brown, white, and green flecked confetti, if you will.
-Meanwhile, combine the water and couscous and a pinch of salt into a pan large enough to hold them and bring to a boil; reduce and let simmer for 15 minutes, or until tender.
-Bring yet another pot (I know!) of water to boil and blanch the asparagus, removing after 2-3 minutes and submerging in cold water to cease it's cooking.  Drain and put into a large bowl.
-To the asparagus, add the olive oil, parmesan cheese, nuts, and lemon juice. 
-Drain the finished couscous and toss with the ingredients in the large bowl; check for seasoning and serve either chilled or at room temperature.

Note:  This salad makes for fabulous left overs.   I think it is because the nuts are cut so small but they didn't seem to go mushy like most nuts do while in the ice box.   After I made it, I separated the rest of it into my usual glass jars and when it came time to put together my lunch before work, I just hard boiled an egg to go on top and it was even better than the day that I made it.  Also, there is nothing in this salad that will spoil, so I ate mine at room temperature, as in I didn't put it back in to the ice box when I got to work.  It just sat happily in my lunch tote until its consumption, but if you are finicky about that sort of thing, there certainly isn't harm in eating it cold.


17 April 2011

Sauteed Cabbage

Hopefully the addition of cabbage to a taco won't be a turn off.  In fact, it is rather a wonderful addition regarding both flavour and texture.  It melts in the mouth so easily, sort of the way that perfectly and slowly caramelized onions do, except more so. It almost isn't even necessary to chew, (except when considering the black beans and corn tortillas, well, chewing sort of comes in handy when it comes time to swallow). And the cabbage is a little tangy, which I really like, especially with the moderately spiced black beans.

Even though I never ate cabbage as a child, there never the less is something very comforting and homely, for me, at least, about a nice bowl of sauteed cabbage.  While it is still piping hot and with just enough salt and a dash of vinegar, maybe add some tomatoes for even more acidity if you like.   Which, actually, I enjoy as a meal in itself: sauteed cabbage with tomatoes cooked in.  It's very nice.  It is the sort of thing I would make if I ever was home sick.

The first time that I had ever had cooked cabbage was a couple of years ago, when I spent some time in Bulgaria.  It was over the Christmas and New Year's holidays with a friend (she had moved to America from Bulgaria to study).  There, it seemed that cabbage was a part of most of the meals.  Whether cooked or made into juice, something that, I find, that most Americans turn their noses up at (and I mean that quite literally, quite a strong smell for those who are unprepared) and indeed, something that I am sure that they were surprised to find how eager I was to not just have, but to enjoy.  In fact, I am sure my complete lack of hesitation to have a glass (or more, if they would be so obliging) was rather a let down for them.  I may not have enjoyed cooked cabbage before my trip to Bulgaria, but I had already had a happy fondness of cabbage juice.

It's just so tangy, yet there is still a natural sweetness to it.  Just enough to balance it.  It is a bit of a labor of love to make, but when done properly, and it seems that there are several Bulgarian women out there that know how to properly steep cabbages and coax them to release all of their pungent and tart juices, it is a complete joy to consume.  Also, I learned, that I was lucky to have tasted this wondrous concoction, seeing as cabbage juice is specifically a wintertime treat.  

Perhaps, the comfort that cabbage ignites within me comes from such wonderful memories of being a part of some one else's family for the holidays when I had left mine back at home.  Either way, I am always happy knowing that there is some cabbage around, whether rolling around in my ice box or sizzling and hissing in my saute pan.


1 small head of green cabbage
2t. oil
(salt to taste)

-Begin by cutting the cabbage into four wedges.  This will make it easy to take out the core, which you can do by angling your knife and making a 45 degree slice into the cabbage, like you would do for apple wedges.
-Now, take your cored cabbage and turn it so that you are perpendicular to it length wise and slice into half inch thick ribbons.  Repeat until all of the cabbage is shredded.
-Heat the oil in a saute pan over medium high heat.  When the oil is hot, add the cabbage and let it cook, turning occasionally, until most of it has taken on a golden hue.  
-Carefully (prepare yourself for a bit of hot steam), pour in 1/3c. water and salt and cover.  Let this cook for another 3-5 minutes, or until the cabbage has softened to your liking.

As I mentioned earlier, adding some tomatoes and red wine vinegar to this, halfway through the browning process, makes for another lovely meal or side dish.  It is also lovely left plane and heaped into a warm corn tortilla with some chipotle spiked black beans.


14 April 2011

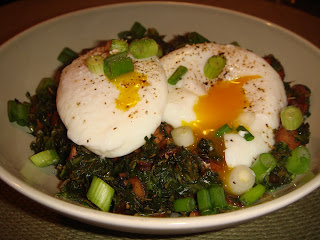
Poached Eggs with Spinach and Mushroom Hash

If there is one culinary wonder, it is the egg.  Not only can eggs be cooked a million and one ways, but they can pretty well make an instant meal of just about anything.  Need a sauce for something?  Hello, Runny Yolk.  In fact, that is my favourite part of the egg.  A nice runny yolk.  That is even how I prefer my boiled eggs, with just the exterior of the yolk gelled. 

All of that being said, you might be surprised to know that I only just learned to poach an egg.  I know.  It's madness.  Yet another intimidating thing for me.

I have happily overcome that.
Finally.


For the premiere of the poached eggs, I served them over a spinach and mushroom hash.  Ok, I call it a hash but I don't really know if technically it is a hash.  Does something have to have potatoes in it to be a hash?  Any one? 

Well, whatever, I like the idea of calling this a hash, and so I shall. 


2 eggs
....
1 box frozen spinach, thawed, and removed of excess moisture
8oz (1 box) cremini mushrooms
sherry vinegar
(salt & pepper to taste)
....
2 scallions

-Begin with stemming and tearing the mushrooms into halves. 

 I say tear because I prefer the texture that the rough edges get when they are sauteed but if you can't tell a difference or prefer prettier mushrooms, slicing them is acceptable.

-When the mushrooms are lovely and a deep caramelized brown colour, pour in a splash of sherry vinegar and chuck the spinach into the pan to heat through.
-In another wider and shallow pot, heat some water, about 2-3 inches worth, until little bubbles form at the bottom of the pot.  Crack the eggs separately, in a little dish.  Using a slotted spoon (you'll need one later to help get out the eggs) swirl the water in the pan until a slight funnel forms.  Drop the eggs in one at a time and keep the water going until the whites begin to cook.  They will need roughly 3-4 minutes to cook.
-To serve, put the spinach hash into a bowl and snip the scallions over.  Remove the eggs, carefully, from their hot bath and blot them on a cloth to remove any water.  Eat immediately with a nice sprinkling of coarse salt and pepper.

On a side note, if you are poaching eggs ahead of time, say, in the morning to have with lunch, put the poached egg(s) into a mason jar and keep in the ice box until you are ready to eat them.  Reheat the eggs by pouring some hot water over them and draining after about 30 seconds. 

Chipotle Spiked Black Beans

Some people say that you are not a true chef until you can make a proper omelette.  Well, I say that at least to be a proper cook, you should be able to cook up a pot of beans.  I know it sounds easy, but for some reason I have always been scared- yes, literally scared- to cook beans.  All of that soaking, picking, rinsing, and simmering business.  What is the point when I can just open a can? 

I suppose the point is similar to that of bread baking, making your own granola, or making your own tuna salad, simply, why not make it myself?  It certainly won't hurt me and it might even build some character and teach me something new.  However you look at it, I think that making things that you could normally buy taste better if only for knowing that I made it and didn't just buy it.  It just tastes better knowing that I put in that teensy bit of effort more.

And really, it isn't like it takes 'effort' to soak some beans, right?


2c. dried black beans
....
1/2c. yellow onion, chopped
2 cloves garlic
2T. chipotles in adobo

-Begin by measuring out the beans and sort of pick through them to make sure that there are not any bits or pieces of  debris that the machine missed.  Soak the beans in water for 6-8 hours. 
-Drain the beans and rinse them off.  Leave in their soaking bowl while you get on with sauteing the onions.  Once they begin to colour and soften, add the garlic and let this cook until the garlic colours.
-Pour in the beans, and stir in the chipotles in adobo, and about 4c. water. 
-Simmer this for 1.5-2 hours or bake in a 350f oven for the same amount of time.  If you are going the baking route, as I prefer, make sure to use a very tight fitting lid or put a puce of foil between the lid and pot. 

I prefer to bake them because I have more freedom.  I don't mind leaving the house while the oven is on, especially if I am not going far  (I can go on my jog/walks while it is baking, which excites me for some odd reason) but I don't dare leave if the stove is on. 
Also, the stove that I have is an electric model and even after cooking on the damn thing for over two years, I don't understand it and prefer to use the oven when ever I can.  It just doesn't seem to cook evenly, and it certainly doesn't adjust as quickly as a gas stove does.


This will serve probably 4-6 people, depending on how you're serving it.  They make for killer left-overs though and are nice to have around as a sort of back up meal or component to a meal.

13 April 2011

Spanikopita

Why is it that the term 'labor of love' automatically brings up negative connotations?  I am on a mission to change that.  Starting with this recipe for spanikopita.  I mean, I understand that phyllo dough can sort of make perfectionist want to rip out their hair and curl up in a ball in the corner and cry for a while, and I imagine that if I was a complete perfectionist, then that would have been me every time that I have worked with it.  But it is really good and makes for  such an interesting texture that, for me, is nice when you're in a bit of a food rut.  Or if you're just hungry.

  It is some seriously delicate stuff.  We are talking, wafer-thin, so much so that you could probably see through it in the dark.  Maybe. 

 Anyway, it most generally comes frozen and even when properly thawed can be difficult and definitely fiddly.  The sheets of this stuff are so thin that it takes about a blink to dry out, but that can mostly be avoided by leaving a damp cloth over the part that you aren't using.  

Still, though, I find that I can never peel away a whole and perfect sheet of the stuff, which is the part that if I were a perfectionist I would have my freak out; however, it doesn't matter.  
Yes, you read that correctly.  It. just. doesn't. matter.  
Who cares, or can event tell, to be honest, that each piece of phyllo was not one perfect sheet when there is spinach and feta cheese to distract them?  

Years ago, when I worked for a restaurant in my city, one of the caterers would make spanikopita for most of her parties.  Her version was a bit different than mine in that the filling was much creamier (I think she used a bit of ricotta cheese and eggs in the stuffing as well.)  and she made the spanikopita in little individual sort of triangular packets.  Talk about fiddly.

This version is much easier, just let the phyllo thaw in the ice box the night before you plan to make it.  When it comes time to make it, saute some onion and garlic, adding the spinach and feta cheese at the last minute.  Measure out some olive oil and brush in between each sheet of phyllo as you layer them into a baking dish.  After a few layers of phyllo (the laborious part,if you will, hence, labor of love) and spread half of the spinach and feta mix in an even layer.  Repeat this method a couple more times and bake until it goes crackly and golden ontop.  Eat it cold, room temperature, hot, however you feel and while I am sure the left overs are fabulous (top that with a fried egg....) however we ate the whole thing.  It was that good.


1/2 of a sweet onion, chopped finely
2 cloves garlic, minced
....
2 boxes of frozen spinach, thawed
....
1c. feta cheese, crumbled
....
1/3c. extra virgin olive oil
1/2 box (or there abouts) phyllo dough, thawed


-The night before (or morning of, whichever is easiest) put both the phyllo dough and the spinach in the ice box to thaw.
-When it comes time to make the dish, preheat the oven to 400f.
-Saute the onions in a swirl of olive oil in a pan until they begin to soften and take on a light golden hue; to this add the garlic and spinach. 

When using formerly frozen spinach, it is imperitive that you make sure to squeeze all of the water from the spinach.  If you have never done this before, there may be a surprising amount of moisture residing within the green pulpy mass, but you'll know when the water is gone.  Usually people just put the spinach into a tea towel and squeeze that, but I just put it in my sturdy sieve and, using a silicone spatula, press upon the spinach until no more water comes out.

-Once the mixture is heated through, remove from the heat source and mix in the feta.
-Now for the somewhat tricky bit- the layering.  I used a 6x10in. baking dish that I sprayed with oil.  Measure out the olive oil into a small bowl.  Roll out the phyllo dough on a completely flat surface and cover immediately with a damp cloth, to prevent drying.  If the sheets break, just keep in mind that you are just looking for a flat layer, so if you end up having to use several sheets sort of like you would in paper mache, its perfectly fine and won't noticeably effect the finished dish.
-Place a sheet of phyllo in the bottom of the pan, folding if necessary.  Brush this with a bit of olive oil, being gentle.  Don't freak out if it tears, because you will repeat this about 6-8 times so any tears or rips will eventually be covered up. 
-When you have finished the first 6-8 layers ('one layer' meaning one olive oil brushed sheet of phyllo dough) spread on half of the spinach feta mixture.  Repeat with the phyllo (6-8 layers), spinach, and finish with another 4-8 layers of phyllo.  By this time you are liable to be bored, so I wouldn't blame you for stopping at four layers but 6-8 is preferable here.
-Brush the top with olive oil and bake for 30-40 minutes, until the top is gorgeously crackly and golden.  Let this cool for about 10-15 minutes and eat cold, room temperature, or hot.


I served mine with some roasted tomatoes which was lovely because they cook at the same temperature and take about the same amount of time as the spanikopita.  After their roasting, they are filled with a tomato-y butter that is gorgeous alongside the spanikopita. 

Roasted Tomatoes

Mmmmm.....nothing better than the smell of roasted garlic in the air.  

Wait, maybe if you added some butter to that.

Oh!  And then, maybe if you stuffed all of that into some tomatoes.....

Oh yes.  We are on to something now....


4 beefsteak tomatoes
4 cloves garlic, thinly sliced
1T. butter
(salt & pepper to taste)

-Begin by preheating the oven to 400f.
-Next, slice the tops off of the tomatoes, using a serrated knife for ease.  Using a small melon baller or grapefruit spoon, get out the seeds and the tough core and toss away. 

(If you are smart, you will slice away the good tomato that surrounds each stem and sprinkle that liberally with salt and pepper as a little cook's treat, but at the time, I was a woman on a mission and by the time I thought of using them...well, it was the next morning and they had been sitting out uncovered on the counter all night and weren't very appealing.)

-Very lightly spray a dish with oil and place the tomatoes, cut side up, onto the dish.  Sprinkle with the sliced garlic, salt, and pepper.  
-Divide the butter among them evenly and slip them into the hot oven and let them roast until they go caramelized and a bit wrinkly, about 40-50 minutes.

I would recommend serving this with something that could use a smidgen of sauce because once these tomatoes make it to the plate, you can cut them in two, letting the tomato-y butter run all over whatever is on the plate, be it rice, bulgur wheat, couscous, bread....you get the idea.  

09 April 2011

Saturday Afternoon's Cocktail

Here is how to enjoy the rare gap between engagements on a Saturday afternoon:


First, get a couple of honey tangerines and something to juice them with (the vintage "Juice King" was just something I had lying around the kitchen).


Second, look in your freezer for that bottle of Ouzo that you bought purely out of kitch because you were having a Greek themed meal on night in the previous week. 

(Oh, and you might want to grab a couple of ice cubes while you're in there....)


Third, pour the juice into a martini shaker (or a glass if you're not a fan of bruised alcohol) along with one shot of the Ouzo (a 4:1 ratio of juice to Ouzo) and shake (or stir) until icy cold.  


Lastly, pour this into a cocktail glass. 
 (You can't tell from the photo, but mine has polka dots etched into it.)  

 This is truly nectar of the Gods.  It is both sweet and slightly tart and (for my palette) the overwhelmingly anisette flavour of the Ouzo is toned down just enough to where it doesn't burn the back of my throat, but I can still very much taste what I am drinking.

Cheers, friends.

07 April 2011

Mushroom Omelette

I have never been a fan of omelettes.  
First of all, the only egg, in my opinion, that is OK to eat cold is a boiled egg, otherwise, I want my egg piping hot.  There is something about a cold egg that just really turns me off.  An egg can go from steamy and luscious to cold and congealed in five minutes flat, and I generally don't like to shovel food into my mouth quite that fast.  All of that being said, imagine my own surprise when while lazily and unsuspectingly watching television one sunny Saturday morning, I saw a cooking show host make a french-style omelette that made my mouth water more than I ever thought possible.  The way that she prepared it was so simple and effortless, which is the way something as simple as an omelette (or any breakfast food, for that matter) should be.  It looked so fluffy and lite and at the same time was very satisfying once in my happy stomach.
  
Omelette lovers, I have finally, and humbly, joined your league.


3 eggs, separated

2T. gruyere cheese, shredded

1.5 c. mushrooms, halved
1/2t. thyme
1t. butter
1t. sherry vinegar

(salt and pepper to taste)

-Begin with preheating the broiler of your oven.
-Saute the mushrooms in a dribble or spray of oil over medium heat.
-Meanwhile, whip the egg whites until soft peaks form.  In a separate bowl, whip the yolks (using as many as you see fit, I used only one, but three would be lovely as well and not damage the omelette any) just enough to break them up and told into the whites.
-Heat a non-stick pan over medium heat and, even though you're using non-stick, spray or dribble a bit more oil in.  Pour the cloud-like mixture into  pan over a medium flame and cover with a lid. 
-Once it sets on the bottom and begins to take on some colour, sprinkle over the gruyere and place under the broiler, watching rather vigilantly, until the cheese has melted.  (While all of this is going on, splosh the vinegar into the pan of mushrooms, let it sizzle a bit and stir in the butter, thyme, and salt and pepper.
-To finish, slide the omelette out of its pan onto a warmed plate (seriously, it makes such a difference) folding it over half-way to make a crescent shape.
-Gently spoon the mushrooms over the egg and enjoy.


The joy of omelettes is that you can make them with a million and one different fillings or just eat them with nothing more than some coarse salt and cracked pepper.  Either way, if you're not an egg-lover, this will convert you; if you are an egg-lover, then, well, you already know where I am coming from.

30 March 2011

Honeyed Pistachio Granola with Apricots

I love granola.  I mean, what's not to love?  Different flavours and textures mingling together to make each mouthful (I mean, really- who has 'just a bite' of granola?) just as perfect as the one preceding it.  Making granola at home is something that I rarely do, but I always enjoy the rare occasion and this time was no exception.  With a minimal ingredient list and minimal hands-on time, this was easy to say the least and made just the perfect amount- 2 cups, after sufficiently sampling.  It also made the apartment smell wonderful.  Like I said- what's not to love about granola?

I will admit, I made this mostly for my father, who loves granola even more than I do.   He also happens to love salt, maybe even as much as I do.  This is the perfect granola to satisfy your salty & sweet craving.  If you would like a less salty version, however, just halve the amount listed and it should be to your liking.


1.5c. oats
1/2 c. raw shelled pistachios
1/2 t. kosher salt
1/4t. cardamon
2 (heaping) T. honey
2 T. butter
1/2 c. dried apricots, quartered

-Put the oven on to heat to 300.
-Combine the oats and pistachios in a bowl. 
-In a small saucepan melt the butter and honey, stirring in the salt and cardamon at the last minute.  Toss this with the oats and pistachios.
-Spread mixture onto a lined baking sheet and bake for 30 minutes, stirring every 10 minutes.
-Let this cool on the sheet for about 30-40 minutes before gently crumbling and embellishing with the apricots.

Enjoy this with yogurt, milk, over ice cream, or as a lovely little snack with tea or coffee.

29 March 2011

Tomato, Leek, and Feta Bake

There is something special about using a new dish for the first time.  You might not remember the specific event for a lifetime, but for some, at least, it can make that evening's meal just a little bit more special.  This time, I even went the extra mile and made a new recipe to go with my new dish.  How appropriate, no? Well, maybe I am just an odd duck. Either way, I dare you to bake up some tomatoes, leeks, mushrooms, and feta cheese in any old dish and tell me that it isn't fabulous. 


2c. white onion, chopped
3c. leeks, cut into half moons and sliced
1c. mushrooms, cut in slices or quarters
2 cloves garlic, minced
1.5c. stewed tomatoes, drained of their canning liquid
2T. tomato paste
3-4oz. feta cheese, crumbled
(dried oregano, salt, and pepper to taste)

-First things first, preheat the oven to 400 degrees.
-In a very, very large pan saute the onions and leeks together, and once they begin to colour, add the mushrooms and garlic. 
-When this has cooked through, add the tomatoes, tomato paste, and seasonings.
-Carefully tip this hot mixture into a baking dish (~12x8inches), strew with the snow white feta and bake for 20 minutes*.  
-If you find that the top hasn't browned enough for you in this time, drizzle with some olive oil and put under the broiler.
-This will make about 6-8 luscious mounds of caramelized vegetables that I urge you to drizzle with a touch more olive oil upon serving.

*Alternately, you could prepare everything up to the baking, wrap, chill and bake later.  However, if you do this in a ceramic dish, please let it come to room temperature as the sudden temperature change from the chilly icebox to the hot oven could cause cracking or breaking in the dish.

Chickpea mash with garlic and anchovies

I am honestly not sure where the inspiration for this came from, but it certainly turned out well.  I took the basic flavours that are in a caesar dressing and instead of tossing it with romaine lettuce, I combined it with pureed chickpeas.   

Originally, I served this with a piece of fish, as the starch option, but I can't help but to think of how tasty it would be to just make a traditional caesar salad and add the whole chickpeas to it.....I'll get back to you on that.


1t. lemon juice
1/2t. worcester sauce
1 clove garlic
3/4t. anchovy paste
1T. greek yogurt
1t. olive oil
1/4t. dry mustard
1/2oz. parmesan cheese
3/4c. chickpeas
4-6T. water or canning liquid

- Toss everything into a food processor and process until you get a mostly but not completely smooth texture.  (Add more water if it needs further thinning.)
-Enjoy with just about anything, adding an extra drizzle of olive oil and a healthy cracking of fresh black pepper upon serving.

Capery Fish Salad


Adding to my ever-growing repertoire of fish dishes, I have made what is simply called 'fish salad'.  No canned fish and mayonnaise concoction here, but rather a more fresh and at the same time brine-y salad using fresh fish and fresh greens. This is a vinaigrette based salad that is flavourful, light, and speedy to whip up.


1 (3oz.) fillet of firm white fish

1-2T. white wine vinegar
1-2T. minced shallot

1tsp. extra virgin olive oil
2t. capers
1/4t. dried dill
dash dried tarragon
2c. salad greens
(salt to taste)

-Combine the shallot and vinegar in a small ramekin and let marinate while you prepare the fish.
-Salt the fish on both sides and sear in a hot pan on both sides.  Place in a foil packet and set aside where the fish will continue to cook from the residual heat that it will hold from the pan.
-Drain the vinegar into a bowl, adding the olive oil to this.  Toss the greens in this simple vinaigrette.
-In the same bowl (why wash two bowls?) combine the drained shallots, capers, salt, dried dill and tarragon.  Get the fish out of it's packet and flake it into this bowl and toss to combine.
-Mound the fish onto the greens and serve.


If you are not partial to such a salty vinaigrette, combining 1T. fresh citrus juice (clementine, in my most recent history), 1 minced Serrano pepper, 1t. walnut oil, and salt.  The longer you let the pepper soak in the vinaigrette, the more mild it will become.


24 March 2011

Potato Soup with Quick Rye Scones

While this was a meal intended to celebrate (a belated) St. Patrick's Day, really the only thing that made the meal even remotely Irish was the use of potatoes and a couple of bottles of Guinness.  No matter though, as the meal was still outstanding. 

I simply cannot help myself when it comes to kitchy and tacky things and so when it comes to the holidays, I feel it is my place in life to be the one among friends and family to prepare the cliche meal that is befitting. 


For the soup:
1.5c. onion, chopped
3c. potatoes, chopped
3.5c. chicken stock
(salt & pepper to taste)
dried dill, to serve

-Saute the onion in a soup pot (~2 litre pot) and when coloured, add the potatoes, chicken stock, and a bit of salt.  Simmer this until the potatoes are cooked, 10-20 minutes, depending on their size.
-Carefully, puree using a food mill or blender, and, if you're so inclined, put through a sieve to get out any lumps.
-Put this back on the stove to heat through, thinning with more chicken stock or water if needed.


Meanwhile........

For the Scones:
136g. (3/4c.) each of rye and AP flour
1t. baking soda
1c. buttermilk or milk
1/2t. caraway seeds

-Combine all in a bowl, form into 4 mounds on a lined or greased sheet pan, and bake 400 for 15-20 min.


Serve with good butter, English, Irish, or otherwise.  This served only the two of us, but it could easily serve 3.  Also, if you prefer the milder leek here rather than onions for the soup, feel free to make that substitution as I think it would be quite nice.

23 March 2011

Coconut Crab Cakes with Avocado Salad

I can't lie.....there is a mischievous child inside of me that really wants to call these 'Krabby Patties'.  I shall restrain myself, however.  What a delight to make and eat these!
  It is a simple process yielding a light yet filling meal that would be perfect for a lunch at home or a dinner for one.  I love the delicate sweetness of crab in combination with the spice of chilies and putting a bit of avocado in with the salad balanced the spice perfectly acting as a sort of coolant when the burn of the chilies struck.


1 can of lump crab meat, preferably organic, drained
1 serrano chili, minced
1t. rice vinegar
1.5T.AP flour
1.5T. desiccated coconut, (unsweetened)
1T. chopped fresh coriander
(salt to taste)
.............
1t. rice vinegar
1/2 t. lime juice
1t. walnut oil
1t. shallot, chopped
1/2 an avocado, cubed or scooped
2c. greens
(salt to taste)

-Pick through the crab meat to ensure that there are no bits of shell, and combine everything above the dotted line in a bowl; cover and let set in the  icebox for about an hour.
-Meanwhile, combine the vinegar, lime juice, oil, and shallot in a small jar and shake to combine.
-Form the crab mixture into three little cakes, being a bit more rough with them than you would think, and saute for about a minute on each side, or until golden and crisped.  Keep in mind that the crab is already cooked, so in sauteing, you are just searing the outside and ensuring that the interior is warmed through..
-Scoop or dice the avocado, toss with the greens and vinaigrette and serve along side the three little crab cakes.

-These can be kept warm in a moderate oven, in a foil packet for up to 20 minutes if need be.
-Also, these can be frozen and cooked straight from the freezer, but please make sure that the crab was not previously frozen.